How to buy a new CPU - the hard way
It's my first blog post in a while, and it's completely different from the things I normally or would like to talk about, but it was something that drove me up the wall enough for me to want to document it in the hope of helping someone else out there on the internet! Just as a disclaimer: everything written in this post documents my experience; views are my own and not of my employer, and I am not responsible for any damage to property or harm to readers who try and replicate these steps.
I recently made the swap over to an Intel CPU—my previous was a Ryzen 3700X which has worked for me quite faithfully since the pandemic. A change between vendors as well as CPU generations generally requires a change in motherboard as well, and with this comes some nice things like faster DDR (I went from low end DDR4 to high(er) end DDR5) and for those who do their research well, features like BIOS Flashback. To a large extent, that is the moral of this blog post: there are actually useful new features on motherboards, ones that might be worth spending the extra little bit of money if you're buying a brand new CPU.
That brings us to the core of the issue: I bought a fairly new model/SKU, the 14700K, from the Raptor Lake refresh line, which came to retail around October this year. With such a recent release, buying a motherboard isn't as simple as reading "Supports XXX Gen" from the manufacturer, as chances are, the BIOS will need to be updated before you can use your spanking new processor. This isn't so much of a problem if you have an older CPU that fits in the same socket, but quickly starts becoming a chicken or the egg problem. So what's the solution?
ASUS Flashback
Allegedly, newer and slightly pricier ASUS motherboards have a feature called "BIOS Flashback". What this lets you do is put a new BIOS (.CAP file) on a USB stick with a FAT16/32 filesystem, plug it into a specially marked USB port in the back, and push a button. What a world we live in now!
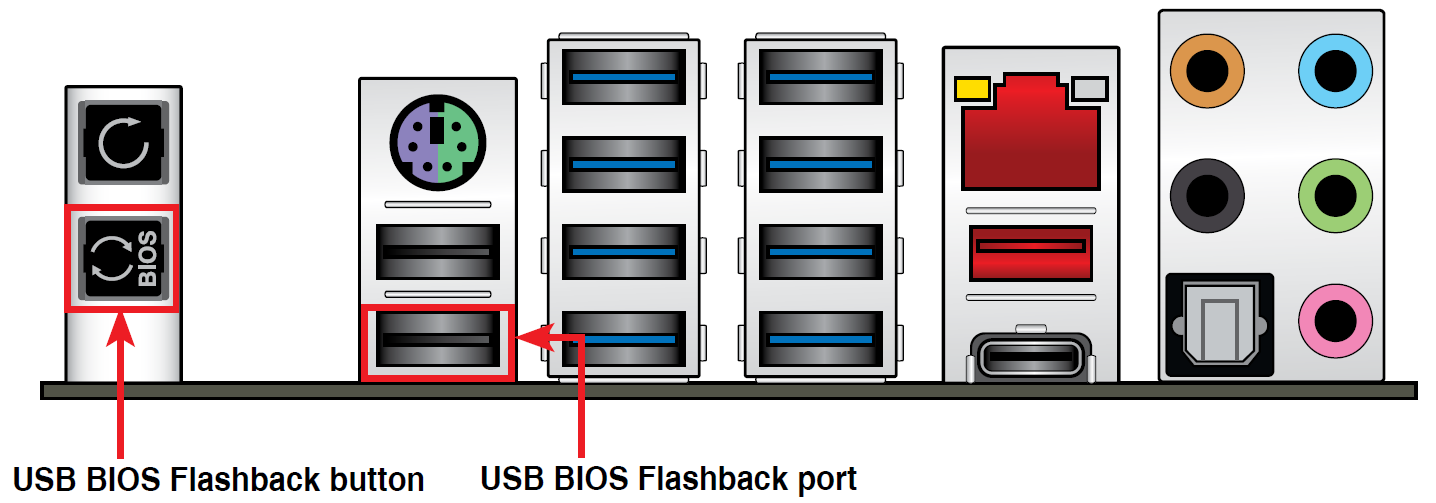
Image pulled from the ASUS support pages. According to the documentation, you just hold the button for three seconds, causing it to flash three times and in about eight minutes you'll be in your new BIOS version!
Now that I've described what can be done, I'll detail what I ended up having to do.
Narrative; for those who care
I seldom make life easy for myself, despite the fact that I often pass to others advice my PhD advisor gave me. It's something to the tune of one hour in the library will save you one month in the lab; basically do your prior research/reading, and you won't have to waste time and effort to realize something. In this case, I had the naive intention that I would just skimp on a motherboard as I intended to upgrade later when some cooler processors come out (especially with NPU units, newer instruction sets, etc.).
I ended up buying the ASUS Z790-P to go with my 14700K Notably, it *does not* have the ASUS Flashback feature. and after close to two hours of cleaning, taking out the guts, rewiring everything, and finally putting it all together, it would not boot. The power button light blinked slowly at me as if it didn't understand my intentions. I opened the case back up, rejigged some wires, and still to no avail. Eventually, it dawned on me that the BIOS might need to be upgraded, given how new my processor was!
Doing some googling, I looked to see where to download the newest BIOS version, and at the same time, how do I upgrade if I can't even boot? A few pages in I realized I was up shit creek without a paddle: everything I could find on Reddit, etc. suggested ASUS Flashback, which I desperately searched for in the Z790-P manual in vain. Eventually, I stumbled upon the less traversed roads of the internet, older electronics forums and the like. Many posts talked about a CH341A programmer tool, which lead me to ordering one on Amazon immediately.
Flashing your BIOS—the hard way
Now I'll cut to the chase. I originally had very little idea what I was doing, and in honesty, I've never had to flash a ROM in such an ad hoc way: the closest is probably plugging some microcontroller into a laptop that controls a stepper motor, and passing it instructions (e.g. number of steps to take, etc.). Once you get over how daunting "flashing your motherboard BIOS" sounds, it really isn't actually too hard—thankfully. At a high level, these are the steps:
Order a CH341A programmer on express shipping, because you're impatient
Unplug AC from the power supply
Find the BIOS chip on your motherboard
Match pins of the CH341A with the BIOS chip
Plug the CH341A into a laptop
Download and backup the image already on the chip
Write the new image
Plug things back in, boot and wait a few minutes while firmware updates
???
Profit
The CH341A
The CH341A truly looks like a hobbyist electronics geek's toy:
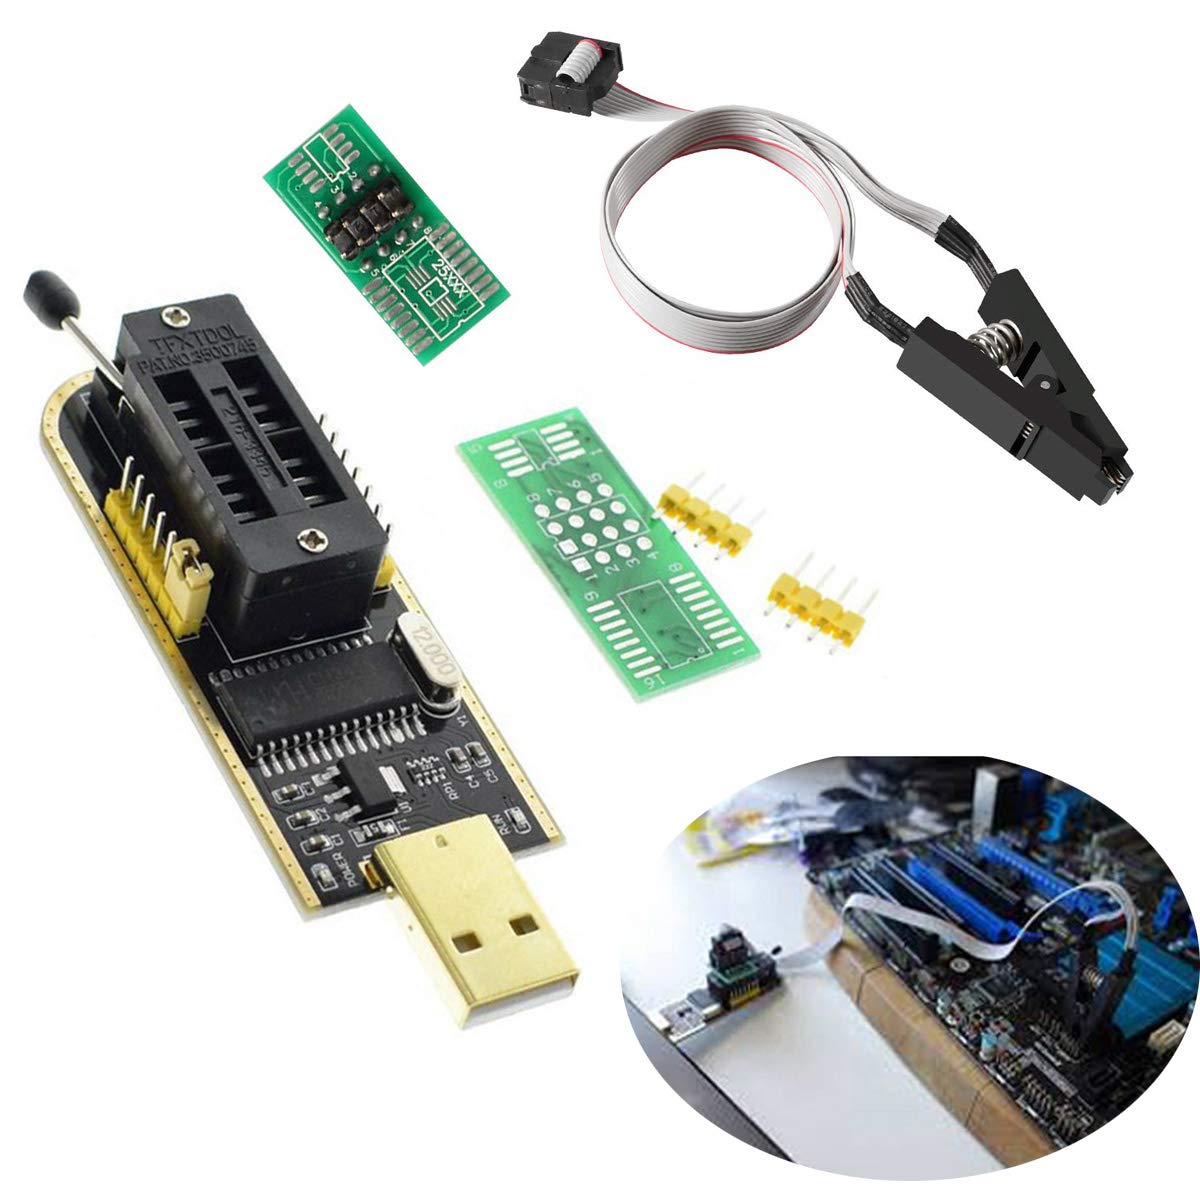
The part with the USB dongle is the CH341A unit, and the clamp is what is used to attach to soldered on BIOS chips (which is the more common approach these days, as I understand it). The red wire helpfully informs the user that is "Pin 1", which is used to match up the CH341A and the chip side. On the CH341A, the 8-pin connector (not the clamp) is connected to the CH341A by first raising the lever, inserting the connector, then dropping the lever to lock the pins in place. The red wire should face the lever side.
For pictures, I'll point the reader to this forum post which actually provided the majority of the run commands, but I provide a bit more information from my own specific experience.
The Motherboard BIOS chip
It seemed like certain brands annotate the BIOS chip, and location will vary. The Z790-P manual doesn't indicate where the chip is, nor is it annotated on the board itself. Thankfully, WinBond appears to be a fairly ubiquitous chip, and a lot of forum posts I've seen show images of them. In these cases, they are 8-pin (4 on each side) chips that look like this:
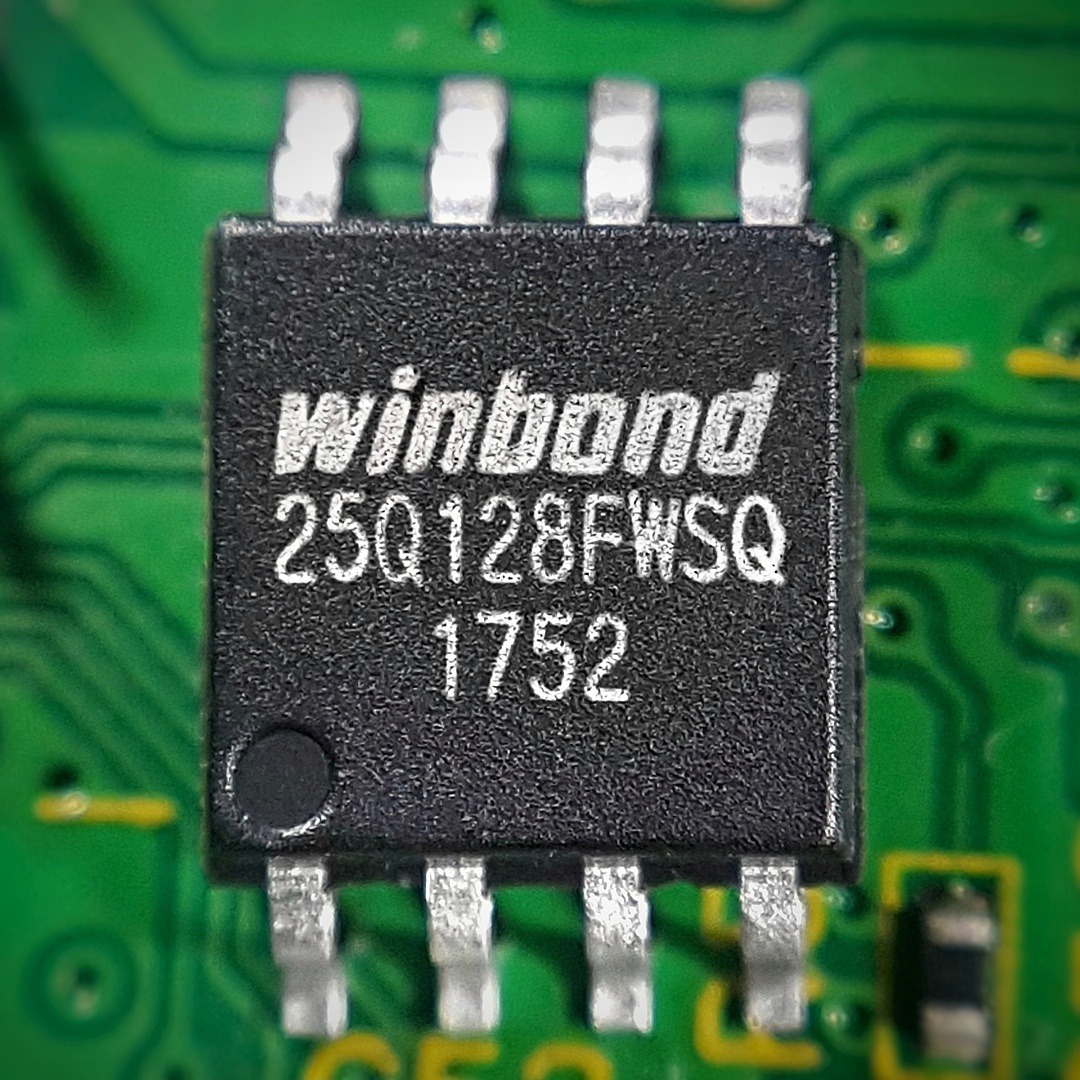
The notch on the lower left corner indicates Pin 1—matching the red wire with the CH341A.
Preparing to flash
Somewhat interestingly, I found the flashing process to be pretty straight forward on Linux. I used a laptop running Fedora 39, and I was able to install the two tools that are needed to carry out the whole process.
First, flashrom can be obtained via dnf. This is the tool that will actually interface with the USB dongle/CH341A in a surprisingly seamless way: I didn't have to do any weird udev rules to make things work and it was just plug and play.
The second tool, uefitool, I got from the Github repository. I didn't want to bother downloading Qt, so I just built binary from source, nominally just needing cmake, make, and GNU compilers (i.e. gcc). You then get an executable uefiextract built. The point of this tool is to extract out the binary from an ASUS .CAP file, which is what you download from the support pages. The key thing with flashing BIOS/ROMs is that the chips have a very specific capacity (16 MB in my case), and the .CAP files allegedly contain some header that pads the file out to ~25 MB or so. All I did was run uefiextract <.cap file> all with the .CAP file in the same folder as the binary, and it created a <file>.dump folder containing a filestructure that matches that of the downloaded .CAP file. Each folder contains a body.bin, and for the most part it is just a matter of finding the body.bin that matches your expected capacity; everything else for me at least was on the order of kB.
Executing the flash
So at this point, disconnected the PC from AC power and brought it to a working space. The CH341A cable is pretty short, and you'll need room to plug the dongle into your laptop and be close enough to your motherboard. Probably the best way would be to actually not have the motherboard mounted in your chassis yet, but I didn't want to take it out again.
I left everything else connected within the PC, except the GPU which I disconnected from the PSU and from the motherboard. I don't think this was necessary, but my BIOS chip was situated right under where the GPU was mounted, and so it gave me extra room to work with. I suggest clamping the chip first, making sure to match the red wire position with the notch on the chip. Once it's secure, plug the dongle into the laptop, and one of the two LEDs will light up (the POWER one). In some posts I read, they showed green and red LEDs to indicate status, but mine only showed red.
Once it's plugged in, you can test the connection and try and red from the chip with:
sudo flashrom --programmer ch341a_spi -r backup_image.binThis will validate your connection, and the dumped binary will also confirm how big your expected image needs to be. At this point, the remaining LED lit up for me, and actually took a good few minutes to copy over.
Now, navigate to where you ran uefiextract, and find the correct-sized body.bin (REGION). You can then run:
sudo flashrom --programmer ch341a_spi -w body.binThis will take longer than the prior step, and at the end will run a verification step. Note that thankfully, flashrom will stop you from flashing the wrong image size: there does seem to be good safeguards with the tool!
Epilogue
Plug in your AC power and video output (HDMI/VGA on the motherboard), cross your fingers, and hit the power button. At first, my case was still doing the slow blinking, but it later turned into a solid light—the screen also showed that some ME firmware was being updated as well, and took a few minutes.